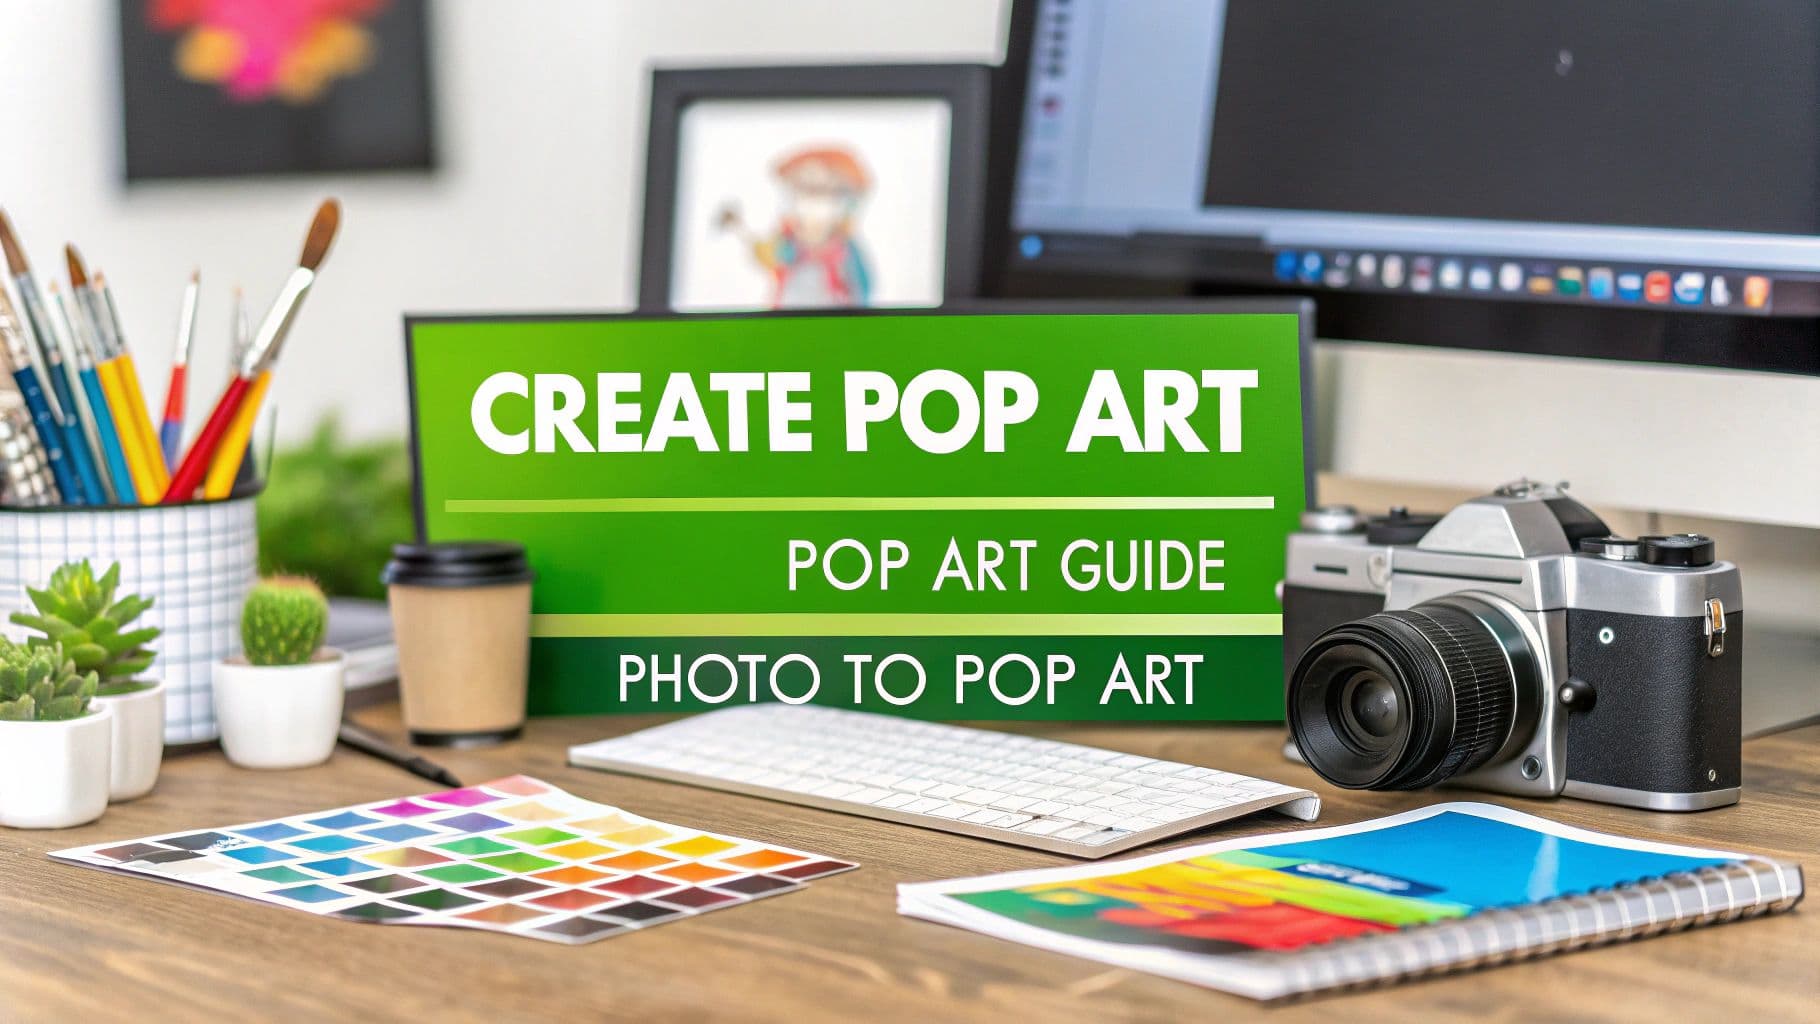
Create Pop Art From Photo: A Modern Creator’s Guide
So, you want to turn a regular photo into a piece of eye-catching pop art? It’s a lot more accessible than you might think. Whether you’re looking for a one-click AI solution, a hands-on project in Photoshop, or a quick edit on your phone, there’s a method that fits your style and schedule. This guide will walk you through actionable techniques and practical examples to get you started.
From Warhol’s Studio To Your Social Feed
Pop art has always been about making the everyday extraordinary. At its heart, the movement takes familiar images—a soup can, a celebrity, a banana—and blows them up with bold colors, sharp lines, and dramatic contrast. This instantly grabs attention, which is exactly why it’s so powerful on visually driven platforms like TikTok and Instagram.
The style’s most famous pioneer, Andy Warhol, changed the game by turning photographs into mass-produced silkscreen prints. His work is so iconic that his American Pop print market has seen a compounded annual growth rate of 27% over the last five years. It’s clear that this photo-based art form has become a serious investment, proving just how much staying power it has.
Why Pop Art Works So Well Today
The same principles Warhol used in his studio are what make content go viral today. High-contrast visuals and electric color palettes are the ultimate scroll-stoppers. It’s a visual shortcut to snagging and keeping your audience’s focus.
In this guide, we’ll explore three modern ways you can create pop art from a photo, each with a practical application.
- AI-Powered Tools: Your fastest option. With just a few clicks, these platforms can generate incredible pop art images and videos. Many offer preset styles, like dynamic comic book filters, that transform your content instantly.
- Professional Software: For anyone who craves total creative control, programs like Adobe Photoshop and Illustrator are the way to go. Here, you can fine-tune every single detail to get the exact look you want.
- Mobile Apps: Perfect for when you’re on the move. These apps are designed for quick edits and social media posts, giving you a ton of fun, easy-to-use filters right on your phone.
Not sure which path to take? This quick breakdown should help.
Choosing Your Pop Art Creation Method
| Method | Best For | Speed | Customization | Practical Example |
|---|---|---|---|---|
| AI Tools | Social media managers, content creators needing quick, stylish visuals. | ⚡️ Fastest | Low | Case Study: A local café uses an AI tool to turn photos of their new latte into a series of pop art GIFs for an Instagram Stories campaign, boosting engagement by 35%. |
| Pro Software | Graphic designers, artists, and anyone wanting a unique, high-quality result. | 🐢 Slowest | High | Case Study: A freelance artist is commissioned to create a personalized pop art pet portrait for a client, using Photoshop to match the colors to the client’s home decor. |
| Mobile Apps | Casual users, influencers, and anyone looking for a fun, fast social post. | 💨 Fast | Medium | Case Study: A travel blogger on a trip to Tokyo uses a mobile app to instantly transform a selfie into a vibrant pop art image for their “Photo of the Day” post. |
Ultimately, the best method is the one that fits your project’s needs and your own creative comfort zone.
By learning these techniques, you’re doing more than just adding a filter. You’re tapping into a rich visual history to make your content more memorable and engaging. Each approach offers a different balance of control and speed, so you can pick the perfect workflow for any situation.
Turn Photos Into Instant Pop Art With AI
Let’s be honest, not everyone has the time or the deep-dive Photoshop skills to create pop art from scratch. If you need stunning, eye-catching visuals right now, AI is your best friend. For social media managers, entrepreneurs, or anyone who needs to quickly turn a photo into something special, AI generators can deliver incredible results in just a few clicks.
The process itself is refreshingly straightforward. You simply upload a photo, pick a style you like, and let the algorithm do the heavy lifting. This magic is usually powered by something called neural style transfer, where the AI studies the content of your photo and the artistic style of a reference image—like a classic comic book panel—and blends the two together.
We get into the weeds of how this technology works in our guide to AI style transfer, but for now, let’s focus on getting you fantastic results.
Choosing The Right Photo For The AI
The old saying “garbage in, garbage out” absolutely applies here. Your final pop art creation is only as good as the photo you start with. To give the AI the best chance of success, look for images with these qualities:
- Go for high contrast. Photos with strong, clear differences between light and dark areas are ideal. This helps the AI easily find edges and shapes, which translates to a much bolder, more impactful final image.
- Keep the subject clear. A photo with one main focus—a person, a pet, a product—works much better than a busy, cluttered scene. A complicated background can confuse the AI and make your final piece look muddy.
- Good lighting is key. A well-lit photo, free from harsh shadows or overly bright, washed-out spots, gives the AI more information to work with. The result? Cleaner lines and richer, more accurate colors.
A simple, well-composed headshot or a product photo against a plain background is the perfect starting point. The AI can then pour all its energy into the stylistic transformation instead of trying to figure out a complex scene.
Case Study: Product Promotion for a Boutique Coffee Brand
Imagine you’re running social media for “Grindhouse Coffee,” a small, independent brand. You have an upcoming Instagram campaign for a new dark roast, but your product shot is clean yet uninspired. This is a perfect scenario for an AI pop art generator.
The Actionable Steps:
- Upload the Photo: Take the high-resolution product shot of the coffee bag and upload it to an AI tool like MotionLaps.
- Select a Style: Choose a “Retro Comic” or “Vibrant Pop” filter. This will automatically apply bold outlines, a limited color palette (maybe a bright blue and orange), and a classic halftone dot texture.
- Generate and Post: Within seconds, the tool generates a short, animated video where the colors pulse and the outlines shimmer. You can post this as an Instagram Reel with a trending audio track.
The Result: What was once a static photo is now a scroll-stopping piece of content. The pop art style makes the brand feel modern and playful, grabbing the attention of a younger audience. This entire process takes less than five minutes, compared to the hours it would take to achieve a similar effect manually. For brands looking to rapidly explore different visual styles, an AI Art Generator provides a playground of creative options.
Getting Hands-On: Creating Pop Art Effects in Photoshop
If you want total creative freedom, Adobe Photoshop is your playground. While AI tools are fantastic for a quick fix, nothing beats Photoshop for dialing in every last detail. This is where you can meticulously craft your color palettes, textures, and lines to create something truly your own. It’s the perfect path for designers, artists, or any creative person looking to add a powerful new skill to their toolkit.
The professional workflow isn’t as complicated as it sounds. We’ll break it down into a few manageable stages: isolating your subject, creating bold line art, building a vibrant color scheme, and adding iconic textures like halftone dots.
Actionable Step 1: Isolate Your Subject
Before you can get to the fun stuff, you have to separate your subject from the background. A clean cut-out is the bedrock of a strong pop art composition.
The Object Selection Tool is usually the quickest way to grab a precise selection around a person or an object. Once you have your selection, use a layer mask to hide the background. This is a non-destructive method, meaning you can always go back and refine the edges without permanently damaging your original image.
Actionable Step 2: Create Bold Line Art with Threshold
With your subject isolated, the next move is to create that stark, high-contrast line art that defines the pop art style. The Threshold adjustment layer is perfect for this.
This tool converts every tone in your image to either pure black or pure white. Drag the Threshold slider until you find a sweet spot that captures the essential features of your subject without becoming too cluttered. This single step is often the most dramatic part of the transformation.
If you’re interested in other ways to convert photos into stylized graphics, we’ve got a whole guide on how to turn an image into an illustration that you might find useful.
This simple visualization shows how AI tools often simplify the process of creating pop art from a photo into three main actions.
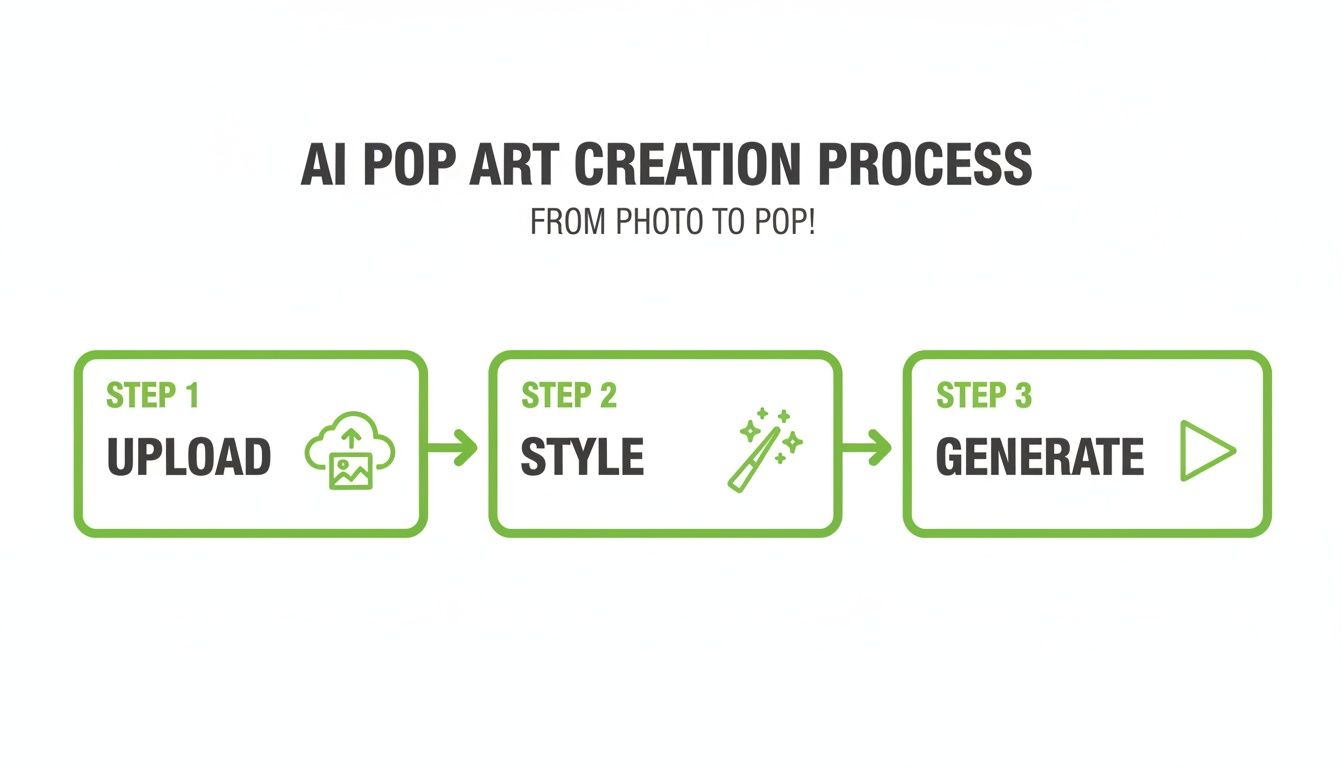
This “Upload, Style, Generate” workflow is what makes AI so attractive for speed, but as you can see, the hands-on Photoshop approach offers a much deeper level of control.
Actionable Step 3: Build a Vibrant Color Palette
Now for the fun part: adding color. Pop art is known for its limited but electric color schemes. The best way to do this is with Solid Color Fill layers paired with layer masks for maximum flexibility.
Here’s the workflow:
- Create a new Solid Color Fill layer for each color you plan to use—one for the skin, another for the hair, one for the background, and so on.
- Invert the mask on each fill layer to black (Ctrl+I or Cmd+I). This will temporarily hide the color.
- Grab a white brush and start painting on the mask to reveal the color precisely where you want it.
Using this method means you can experiment with different color combinations on the fly. Don’t like that shade of yellow? Just double-click the fill layer’s thumbnail and pick a new one.
Actionable Step 4: Add the Classic Halftone Dot Pattern
The final touch that really sells the classic pop art vibe is the halftone dot pattern. This iconic, comic-book-style effect mimics old-school commercial printing.
You can create this effect in Photoshop using the Filter > Pixelate > Color Halftone menu.
Pro Tip: For the best results, don’t apply the filter directly to your art. Instead, create a new layer, fill it with 50% gray, and set its blend mode to Overlay or Soft Light. Then apply the halftone filter to this gray layer. This keeps the effect separate and lets you control its intensity without messing up your color layers underneath.
Of course, Photoshop isn’t the only tool out there. If you’re exploring your options, checking out a comprehensive photo editing software comparison can be a huge help. Mastering this Photoshop workflow definitely takes some practice, but the ability to produce unique, high-quality pop art from scratch is a skill that will make any creative project stand out.
Choosing Your Signature Pop Art Style
The secret to creating pop art that actually stops people from scrolling isn’t the tool you use—it’s the style you develop. Anyone can slap a filter on a photo, but making deliberate choices about colors and textures is what will give your work a unique, memorable vibe. This is where you move past the presets and start building a real visual identity.
Just think about Andy Warhol’s iconic prints. They’re instantly recognizable because of their bright, often jarring color combinations that feel both rebellious and slickly commercial. The magic is in the limitation; he built a powerful look using a small but carefully chosen palette. You can do the same by picking just three to five bold, saturated colors to work with.
Building Your Color Palette
A great way to get started is by playing with complementary colors—the ones sitting opposite each other on the color wheel. The tension between a bright orange and an electric blue, for example, creates an immediate jolt of visual energy that’s perfect for pop art.
You can also let your brand guide you. If your business has a signature green, why not build a palette around it? You could use analogous colors (its neighbors on the color wheel) for a more harmonious feel, or go for a triadic scheme if you want something more dynamic.
Here are a couple of actionable palettes to get you started:
- Retro Punch: A vibrant mix of teal, orange, and magenta.
#00A0B0(Ocean Boat Blue)#EDC951(Lemon Curry)#CC333F(Cinnabar)
- Modern Neon: A sharp, futuristic combination.
#F83D5C(Fiery Rose)#3DF8A3(Malachite)#883DF8(Medium Slate Blue)
The goal isn’t just to add random colors; it’s to use them with intention. A well-chosen palette can instantly set a mood—playful, aggressive, nostalgic—and make your work unforgettable.
Beyond Color: Key Stylistic Elements
While color is the headliner, other classic elements really sell the pop art aesthetic. Weaving in these textures and line styles will give your images an authentic, handcrafted feel.
With billions of images shared daily, the raw material for pop art remixes is endless. The photo-sharing economy is valued at nearly $5 billion, giving creators an infinite canvas to stand out. You can dive deeper into these photography trends on Greatbigphotographyworld.com.
To really nail the look, try adding these classic touches:
- Bold Outlines: Thick, black lines around your subject are a staple. They create that comic-book energy and make your image jump off the screen.
- Halftone Textures: You know those signature dot patterns? They’re a throwback to old-school printing methods and instantly add a layer of retro charm.
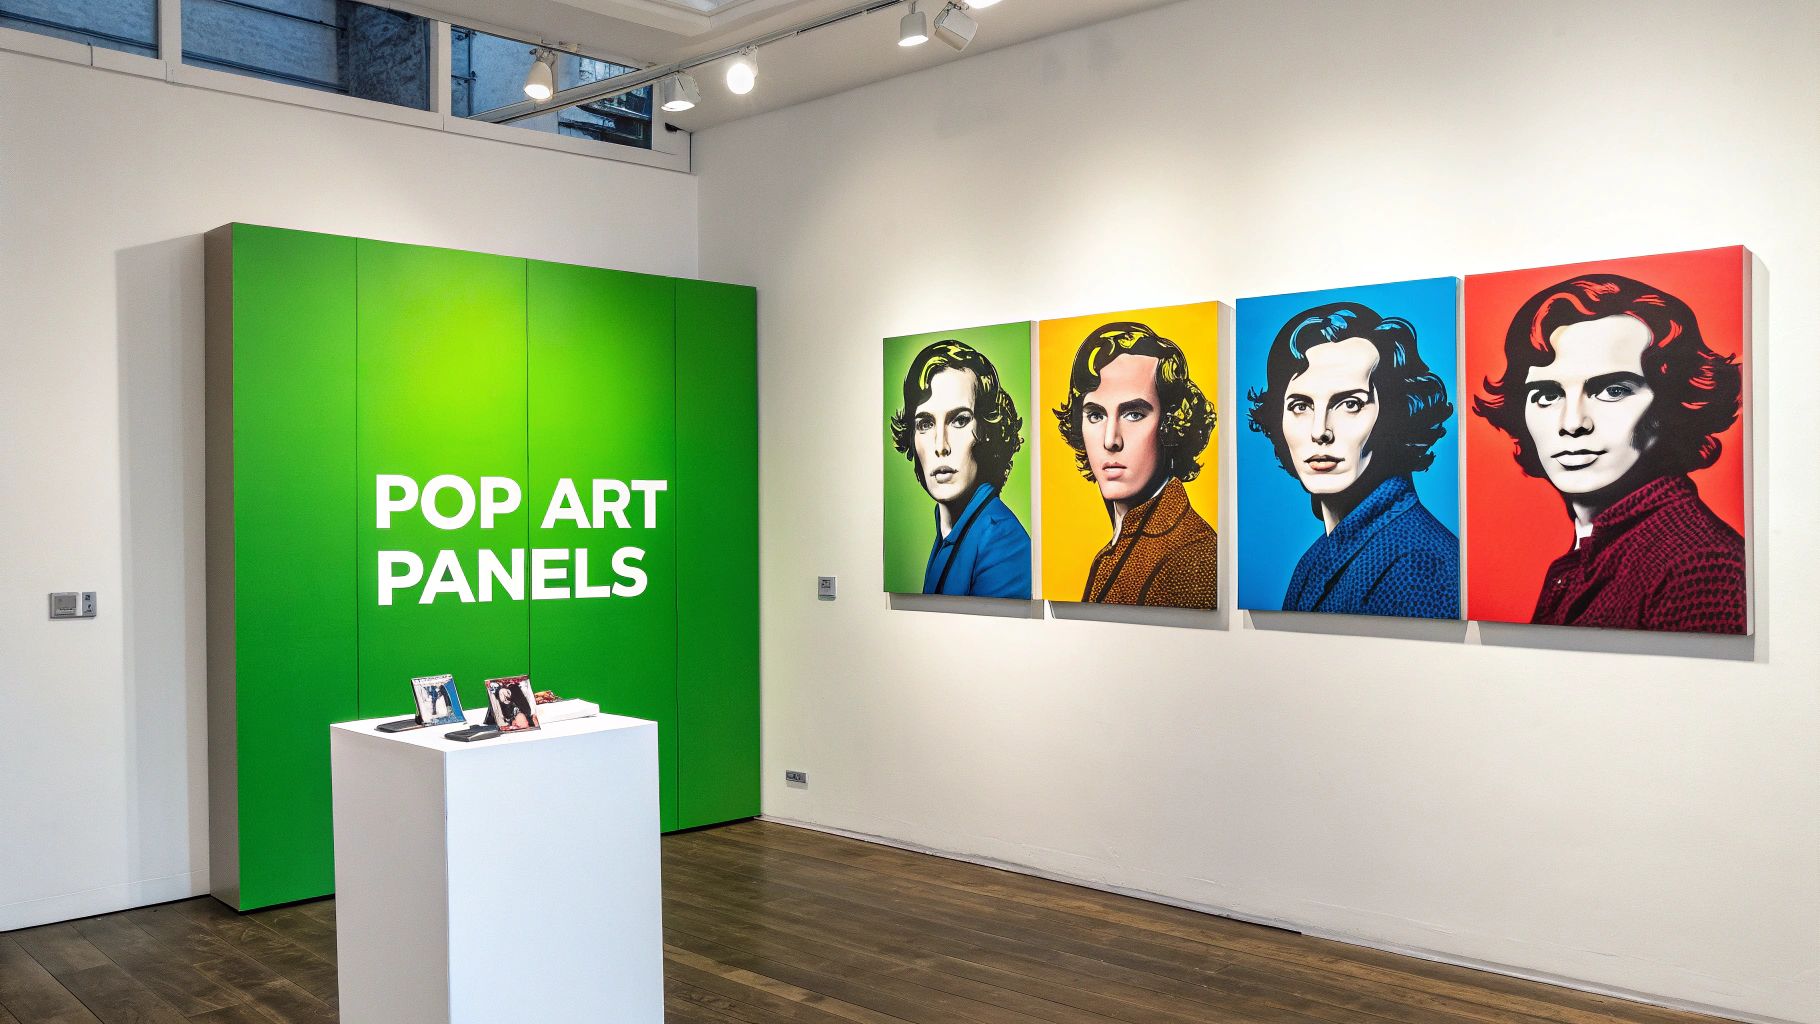
- Repeating Motifs: Don’t stop at one image. Take a page from Warhol’s book and duplicate your subject in a grid, giving each panel its own unique color treatment.
By combining a smart color strategy with these stylistic details, you’ll be able to create pop art from a photo that doesn’t just look cool—it tells a story and starts to build your signature style.
Beyond the Basics: Advanced Pop Art Techniques
Once you’ve got a handle on the basic color and texture work, the real fun begins. This is where you can start combining techniques to create something that’s uniquely yours, moving beyond a simple filter to craft a signature look. Think of it as evolving from a single cool image to a piece that tells a story.
A truly iconic technique, and one you’ve definitely seen before, is the multi-panel composition. Andy Warhol perfected this with his prints of Marilyn Monroe and Campbell’s soup cans. It’s all about taking one base image, repeating it in a grid, and then giving each panel its own bold, distinct color palette. This repetition isn’t just for show; it amplifies the subject and creates a visual rhythm that’s impossible to look away from.
Building the Classic Multi-Panel Grid
Putting together a multi-panel grid is actually much easier than it sounds. Whether you’re using Photoshop or Canva, the process is pretty much the same. Just start with a larger canvas and place your main pop art image in one quadrant. Then, duplicate it three times to fill out the grid.
Now comes the fun part—coloring each panel.
- Panel 1: Start with your original color scheme.
- Panel 2: Try a complementary palette, like a vibrant purple and yellow.
- Panel 3: Go for a monochromatic feel with different shades of a single color, like blue.
- Panel 4: Go all out with a wild, clashing palette that grabs attention.
What you end up with is a piece that feels both cohesive and wonderfully chaotic. This approach is fantastic for website hero images, social media posts, or even physical prints. The style’s connection to photography is as strong as ever; Andy Warhol’s works pulled in $256 million at auction recently. Even in a fluctuating market, the value of his photo-series sets shot up 135% from 2021-2022, proving just how much these creative variations resonate. You can dig into more of these art market trends on russell-collection.com.
Weaving In Text and Animation
To really lean into that classic comic book vibe, you need to bring in some text. A well-placed speech bubble with a quirky phrase or a bold onomatopoeia like ‘POW!’ or ‘BAM!’ can inject a ton of personality and narrative into your artwork. Think about where you place these elements to guide the viewer’s eye and add another layer of visual pop.
For anyone working with video, these techniques are a goldmine. Imagine animating a multi-panel grid where the colors shift in time with a music track. That’s a killer intro for a YouTube video or a scroll-stopping Reel right there.
By mixing multi-panel layouts with text and even a little bit of motion, you can create pop art from a photo that goes way beyond a simple stylized image. You’re building a compelling piece of content and developing a visual brand that people will remember.
Common Questions About Making Pop Art
Even after you’ve got the tools and a few techniques under your belt, some questions always seem to pop up. Let’s tackle the most common ones I hear, so you can start turning your own photos into pop art with confidence.
What Kind of Photo Works Best for Creating Pop Art?
Honestly, a high-contrast photo with a really clear subject is your golden ticket. Think of a portrait where the person is sharply in focus and the background is simple or even blurred out. This makes it so much easier for any tool—whether it’s an AI app or you doing it manually in Photoshop—to isolate your subject.
On the flip side, try to avoid photos that are blurry, poorly lit, or just too “busy” with a lot of distracting things in the background. A good, clean portrait or a crisp product shot is the perfect canvas for a killer pop art transformation.
Can I Make Pop Art Without Photoshop?
You absolutely can! While Photoshop gives you the most granular control, it’s far from the only game in town.
If you just want fast, great-looking results, mobile apps like PicsArt or ToonMe are fantastic. They have a whole library of pop art filters and effects you can apply right from your phone in seconds.
For an even quicker turnaround, especially for images and videos, AI-powered platforms like MotionLaps are a game-changer. And if you’re looking for a free desktop alternative, a program like GIMP is incredibly powerful. It really just comes down to your budget, how much time you have, and how deep you want to dive into customization.
How Do I Pick the Right Colors for My Pop Art?
My best advice? Start with a limited palette. Pick just three to five bold, saturated colors and stick with them. A classic trick that always works is to use complementary colors—think blue and orange, or purple and yellow. They sit opposite each other on the color wheel and create a really dynamic, eye-catching effect.
You could also pull colors directly from your brand’s style guide to keep things consistent. But don’t be afraid to get a little weird with it! Pop art is all about breaking the rules and creating something exciting.
The key is to be intentional. A limited, well-chosen color palette will always look more professional and impactful than just throwing a bunch of random bright colors at the canvas.
Is It Legal to Turn Any Photo Into Pop Art?
This is a big one, and it all boils down to where the photo came from. If you took the photo yourself or you’re using a royalty-free stock image, you’re in the clear. Go wild!
The trouble starts when you use a copyrighted image—say, a famous photo of a celebrity or a brand logo (like Warhol often did). If you plan to use your creation for commercial purposes, you could land in hot water.
For anything related to your business or marketing, always use photos you have the explicit rights to. It’s just not worth the risk.
Ready to skip the learning curve and create stunning animated pop art in minutes? MotionLaps uses AI to turn your photos into viral-ready videos with bold styles and dynamic effects, no editing experience needed. Start creating for free at MotionLaps.ai and bring your visuals to life.